The Ultimate Guide In Understanding Intervals On The Guitar
The Key To Dominating Your Fretboard: Guitar Intervals
By Antony Reynaert
During improvisations on guitar, you need to find relationships on the fretboard in a split second. The moment you need to start thinking, all your plans will go awry. You can’t afford this or you will be stuck forever on the ‘just learning songs with tabs’-level and never know how to really express yourself on guitar, because you don't know how the neck of the guitar really works.
In order to not waste a lot of time trying to learn the guitar fretboard, it is essential that you stop learning combinations of notes and what notes relate to each other. If you want to master your fretboard you need to stop thinking in notes and start to think in note functions and intervals. This one method will help you to master the neck of the guitar much faster and more easily, so that you know in a split second what the absolute best notes are to play during improvisations.
The ultimate goal is to gain full access and control over the fretboard like a real master of the guitar. By knowing the relations created with intervals between chords, scales, arpeggios, modes etc. you will really dominate the whole fretboard and play with ease and without the need to think about notes while you play.
Understanding Intervals On The Guitar To Reap The Benefits In Your Overall Development
Guitar intervals are the building blocks of everything you play on guitar: your scales, your chords, your arpeggios. It’s all assembled with intervals.
An interval on the guitar can be described as the distance from your root note, or the starting point, to another note on the fretboard. It’s basically a musical distance between two notes and is represented by that specific distance. Let’s take a look at the existing intervals on this guitar intervals chart:
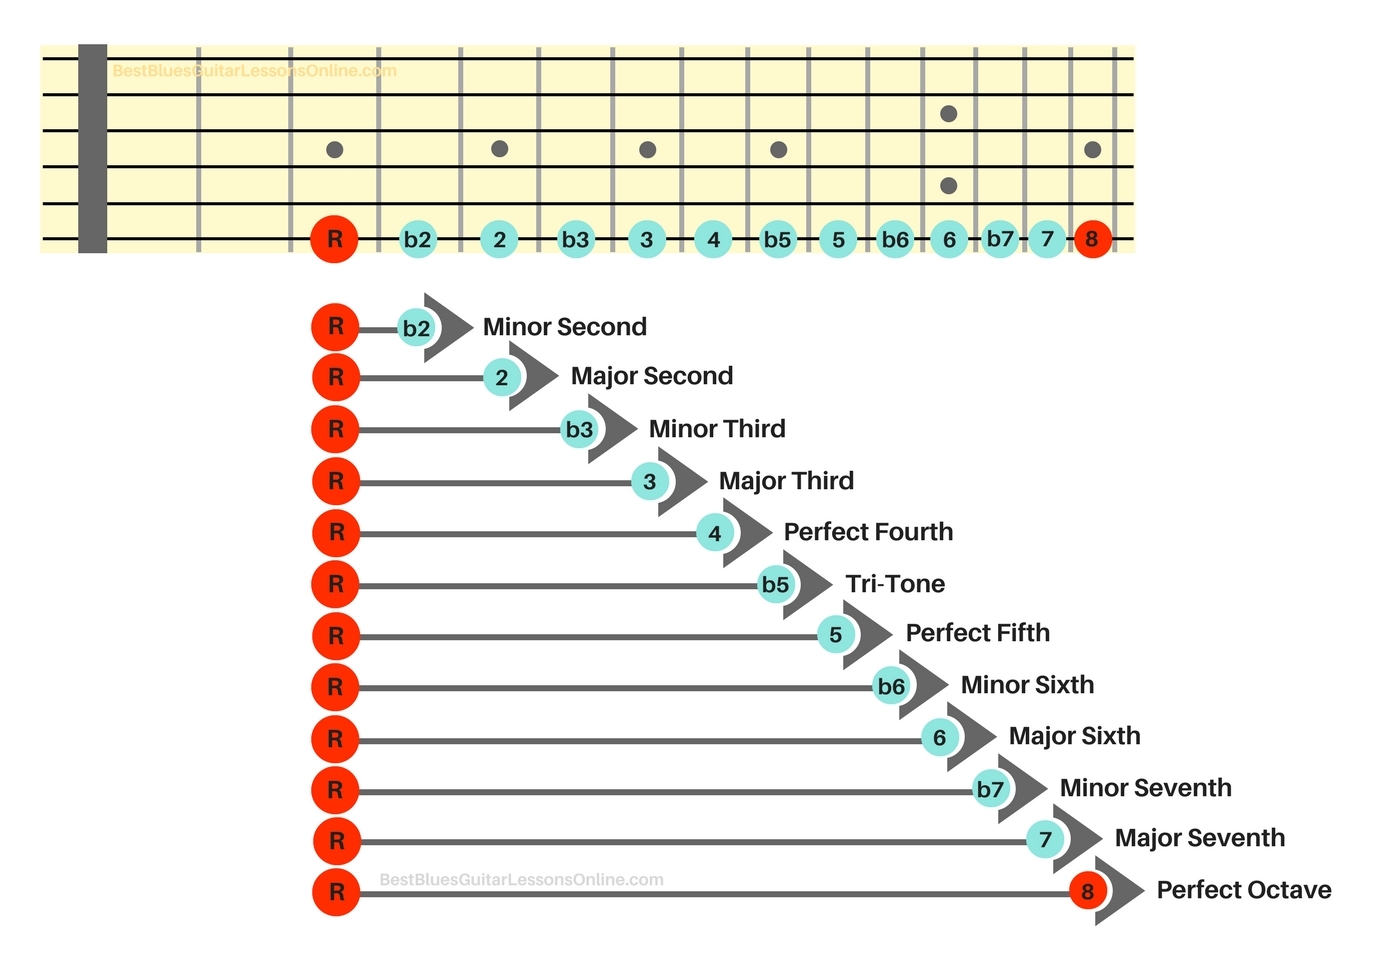
On the image above, the root note or starting note is the G. But that’s the beauty of intervals. It doesn’t matter what the starting note is, the distance always stays the same.
The way you used to remember all notes that relate to a certain root note will be history after collecting the vital knowledge from this article. With guitar intervals you just need to know one note on the guitar fretboard: the root note. From that point on the guitar fretboard, the relationships of the intervals are the same. Take for example the C note with the minor second interval:
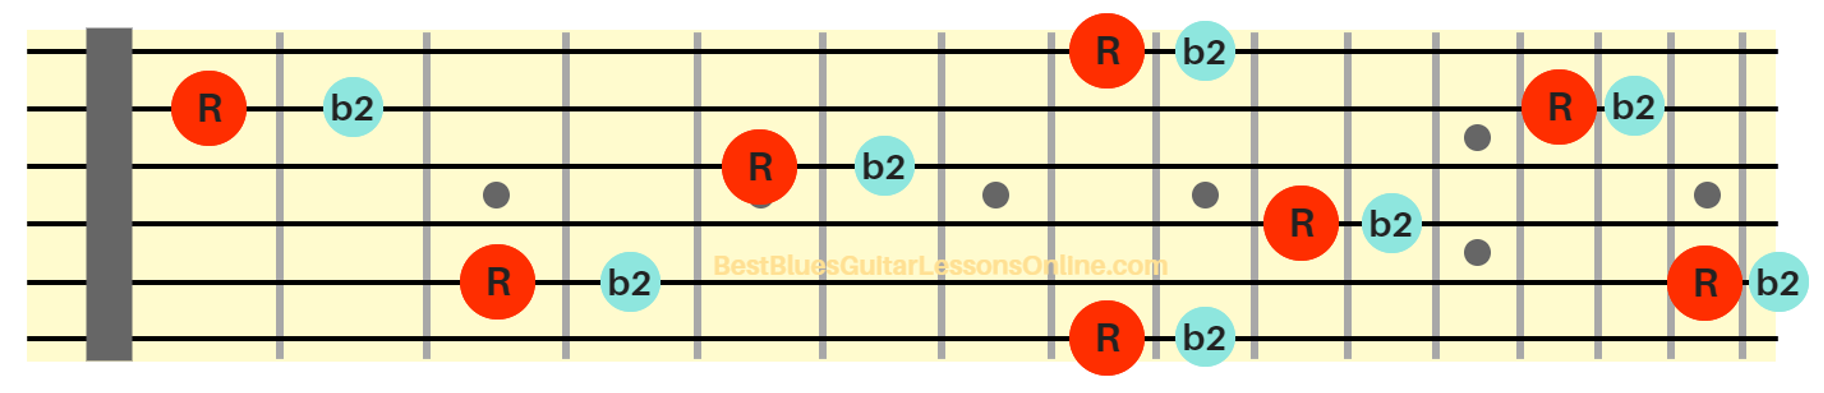
Knowing the guitar intervals on one string is the first step in understanding them. These intervals on one string are called ‘melodic intervals’. This means that the only way you can play both notes is by playing them one after the other. In other words we are playing melodies.
Starting off with the guitar intervals on one string is a good way to get a hang of them and get a good understanding of what they are. But of course you can’t limit yourself to just knowing these intervals on one string. Otherwise you won’t get the full image of the guitar fretboard and you will still be stuck in not understanding the full picture of the fretboard.
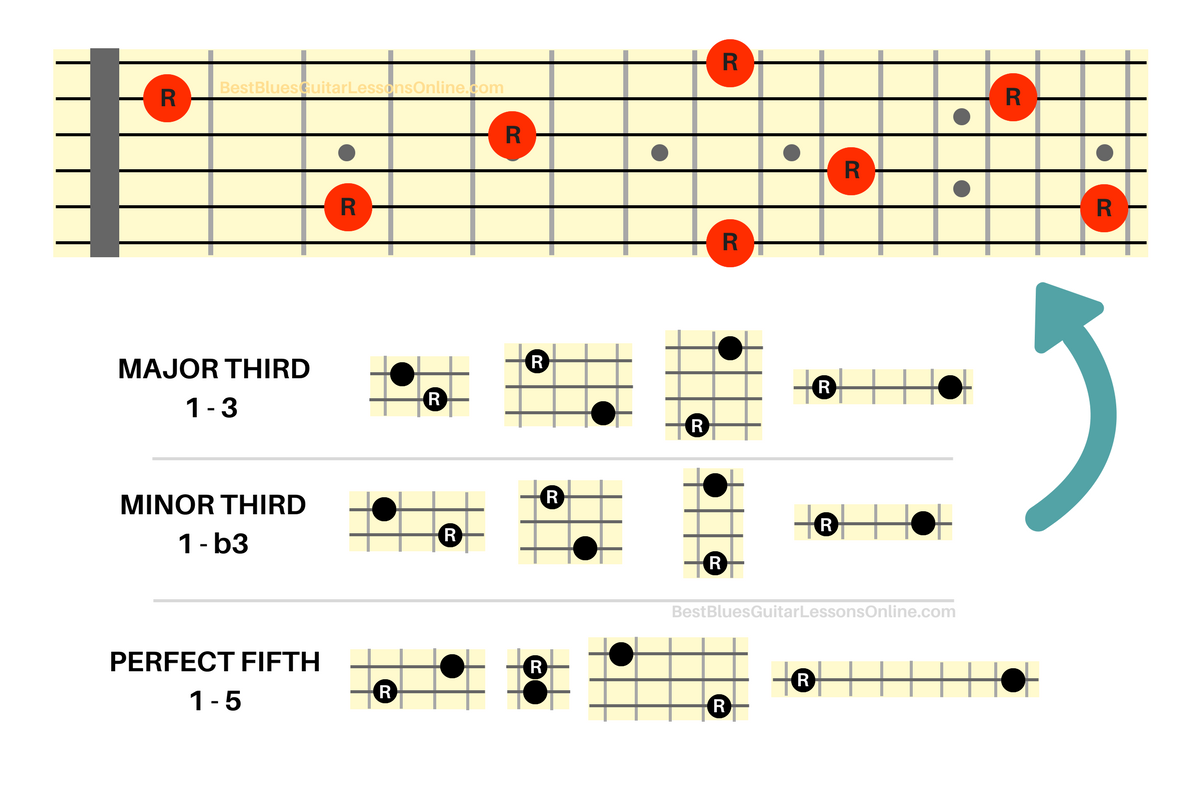
Like I mentioned earlier, intervals are the building blocks of music. You find these building blocks in everything on the guitar: chords, arpeggios, scales, etc. By knowing the ‘harmonic intervals’ I explain in the next section, you will gain a full view of the fretboard and start to see how everything is connected on the guitar fretboard.
Harmonic intervals are different from melodic intervals. With harmony, we mean that notes are played at the same time, rather than one note after the other. Basically, the harmonic intervals are constructed on two strings of the guitar so they form a shape. Just like you would be learning chord shapes, we will now learn these interval shapes in just the same way.
Let’s take a look at some of these harmonic intervals on the next guitar intervals chart:
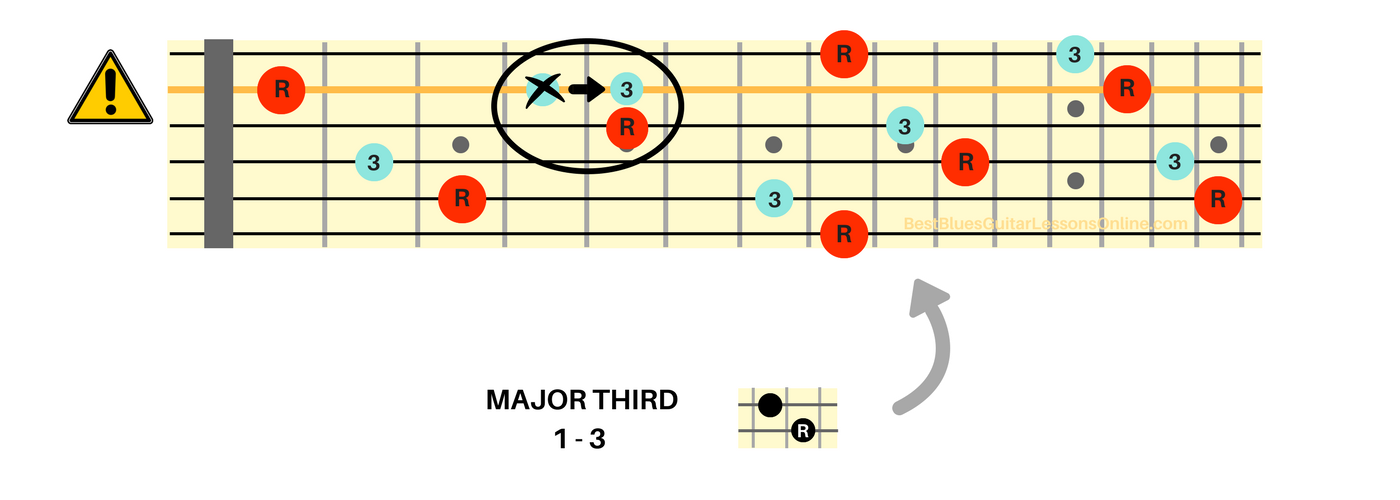
The beauty of these interval shapes is that you can now place them everywhere on the fretboard in relation to the root note. But there is one caveat that can’t be missed! Everything from the B string on moves a half step down. In other words everything moves one fret to the right, just like the example below were we apply a major third interval shape to the fretboard.
I want to challenge you to find all the other interval shapes. By assembling and searching for the other ones yourself, you will learn a lot. Make it part of your guitar practice routine to learn the shapes one by one to finally get them all into you muscle memory. Nobody can learn all the intervals in just a snap of a finger so don’t forget that this will take some time.
Knowing all the shapes is a crucial aspect in you overall development as a guitarist. By neglecting to learn the interval shapes you will blindfold yourself and will never understand the guitar fretboard. Don’t let this happen and start now by learning how to notes are connected to chords when soloing in my free how to solo over chord changes guide.
Why Intervals Are Shortcuts That Will Help You In Becoming A Master Blues Guitarist
Intervals are represented by numbers, while the musical alphabet uses letters. The problem with letters is that for every root note all other notes (letters) change. With guitar intervals it’s much easier because everything stays the same. You only need to find the root note on the fretboard and apply the shapes of the interval. Knowing these shapes is the key to success. We’re basically thinking ‘in function of’ rather than ‘in notes’.
Let’s take a look at the next example to really understand this and how it benefits you as a guitar player. What if you need to construct a dominant seventh chord and you have no idea how the chord looks like. Or what if you need to play a blues solo over a dominant seventh chord but you have no idea what scale you need. Instead of learning and knowing all the notes for each root, you just need to know one formula.
|
Chord |
Notes |
Interval Formula |
|
A dominant seven (A7) |
A - C# - E - G |
1 - 3 - 5 - b7 |
|
Bb dominant seven (Bb7) |
Bb - D - F - Ab |
|
|
B dominant seven (B7) |
B - D# - F# - A |
|
|
C dominant seven (C7) |
C - E - G - Bb |
|
|
C# dominant seven (Db7) |
C# - E# - G# - B |
|
|
D dominant seven (D7) |
D - F# - A - C |
|
|
etc. |
etc. |
As you see, whatever dominant seventh chord you want to construct, it comes all down to one simple formula. The next step is relative simple. Use the intervals to either construct the chord or to find the notes you can use for a solo.
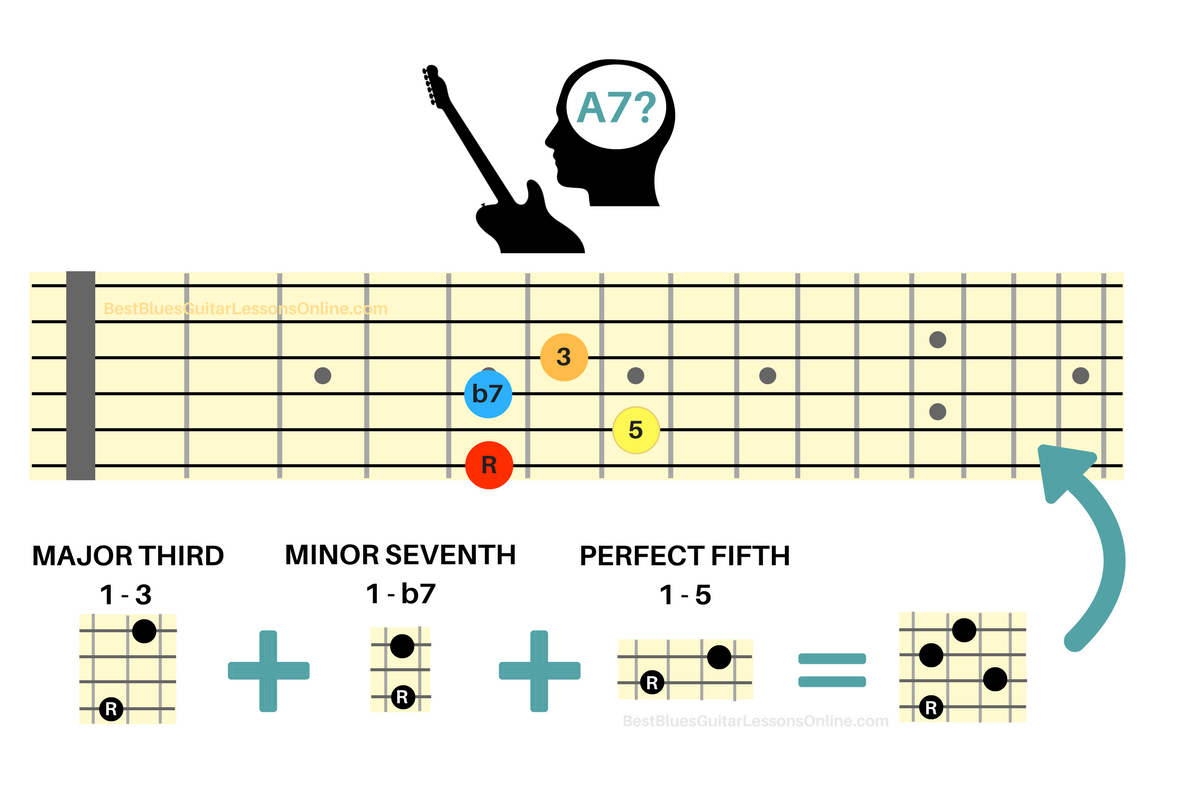
This example above is just one way to construct this A7 chord with intervals. The reason why this is important is when you’re for example playing live and you need to find the A7 chord closest to where you are at the fretboard, this is the way to do it.
Also, this method on how to construct chords, can basically be applied to scales or arpeggios too. When you need to solo over an A7 chord, just use the intervals from that chord to solo. No need for you to know the notes you’re playing, just use the interval shapes.
It will take some time to really develop the ability to construct chords and scales in your head with the intervals on the guitar and apply them in a split second. For the previous example with the A7 chord this was probably easy for you because you probably already knew the A7 chord. But what if you need to construct chords such as an Am7b5 or you need to solo over this chord in a jam. Then it’s already a lot more difficult so you really need to work on these skills in order to gain that fretboard freedom.
Besides the fact that you need the knowledge on how to use the fretboard, you need to sound interesting to an audience. A lot of guitar players lack that emotional impact in their solos and don’t really have a clue what to do about it. Instead of sounding fake and amateurish you need to gather practical information on how to fix this. I wrote a free guide with exercises to gain emotional freedom during a blues guitar solo.
Ready to build a great foundation to your blues guitar playing? Learn about The Essential Blues Course.