How To Master And Conquer Any Guitar Lick And Develop Your Personal Sound On Guitar
By Antony Reynaert

Do your guitar solos sound like you’re just going up and down a scale? Would you like to sound different from your peers and have your own distinctive sound on guitar? In this article you will learn the exact process great guitarists use (whether they know it or not) to master guitar licks and make them their own.
You may have had the joy of copying or learning a guitar lick, but did you really learn that lick inside out? Chances are you’ve only gotten 30% of the full potential a lick can bring to your guitar playing, as being able to play it is only were the learning starts. After following the steps in this article you will know how to get the full potential out of every guitar lick you learn.
What Great Guitarists Think About When Learning Blues Guitar Licks
STEP 1 - Build Your Vocabulary Of Licks
Scales and arpeggios are the building blocks for creating melodies and solos so learning them is crucial for improvising. However, in the end it is the way you put these blocks together what makes your solo sound like music. The process of learning how to really internalize guitar licks starts with seeing and experiencing how great guitarists study licks themselves.
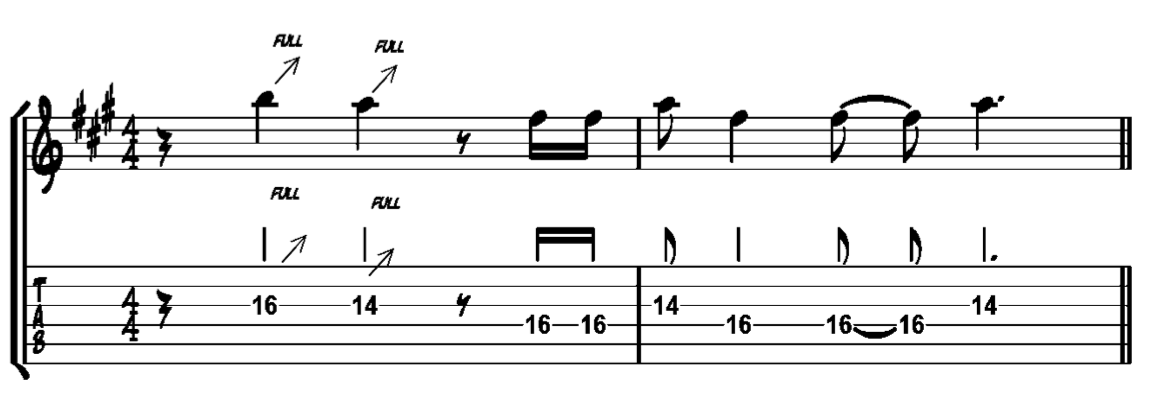
We will use the lick below as an example to go through the 5 steps. Of course you can use as many other licks as you want to repeat the process afterwards and improve your skills even further.


Make sure you play this lick more than just a few times without making mistakes (play it without tempo, every motion isolated from the next motion). This is because we first need to get used to playing this lick and to the way it sounds.
STEP 2 - Break Down The Lick Until Nothing But The Core Is Left
It is of crucial importance to know in what context your lick can be used. We want to be able to use it in different songs/situations and not only when we play the song we took it from. So we need to break it down and understand why it works. By doing so the lick will also be much easier to remember. The lick from the example is one I took from a solo by John Mayer, it occurs after the second chorus of his song Vultures (album Continuum). In this case the lick is being played on an F#m chord, so you could use this lick whenever you play over an F#m chord in your own improvisation.
Experienced guitarists don’t play random licks when they improvise, they know which notes will sound best over each chord. So with our lick it is important to know what these notes actually mean within the chord of F#m. In my Guide on How To Play The Most Awesome Licks Over Any Blues Chord you will learn exactly how to play the best sounding licks over chords instead of using one scale over an entire chord progression.

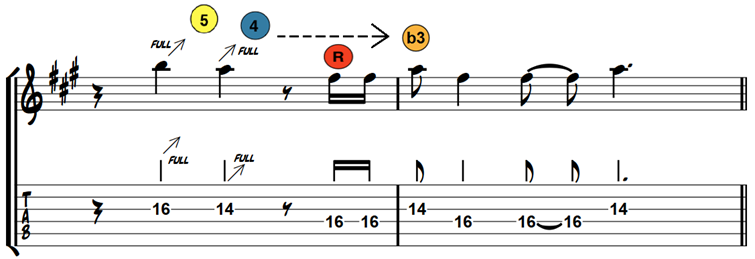
* R = Root note (red)
b3 = 3rd note from the relative scale (orange)
5 = 5th note from the relative scale (yellow)
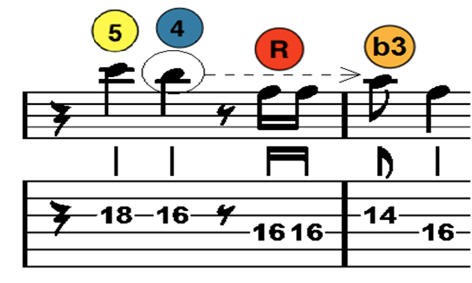
With these colors we’ve indicated the chord tones. Note that with bended notes I don’t take the starting point into consideration, the note you end on is the approached note (the one we land on) so it is the one we should pay attention to. To get a better overview I wrote down the lick without string bends, the notes that are written are the ones the string bends ends on, the note that eventually sounds.
NOTE: depending on your level of knowledge of music theory the below description might sound somewhat abstract. If this is the case I would recommend you to read this article about Chord Tone Targetting.

The first three notes are 5 4 R, which would be a perfect arpeggio downwards if 4 would be b3, so you could say the b3 is substituted by the next note from the scale (4 comes right after b3). This creates some tension because our ear expects to hear the b3 instead of the 4. The b3 is being played in the next bar so the tension is resolved. At the end of the lick the two last notes (R & 3) are repeated.
The relative scale here is the F# Dorian scale (R 2 b3 4 5 6 b7). Take note that every note fits in the minor pentatonic scale of F# (R b3 4 5 b7), which is used a lot in blues guitar soloing.
If we look at it from this point of view, we could analyze it as follows:
When playing this lick we start on the 5th note from the scale and play the scale descending (downwards in pitch) from there on. As explained above we are skipping the b3 (instead playing the 4) to go to the root and then play the b3. Look at the color coded chord tones above the tablature to follow the analysis from above:
STEP 3- Build The Lick Back Up To Establish Your Personal Sound
Now that we’ve broke this lick down to understand and remember it, you could already use the lick while improvising if you’d practice it the right way. Now we will start changing the lick to get different versions or variants of it, so that we can take this to the next level and achieve our own unique sound.
1. Transpose
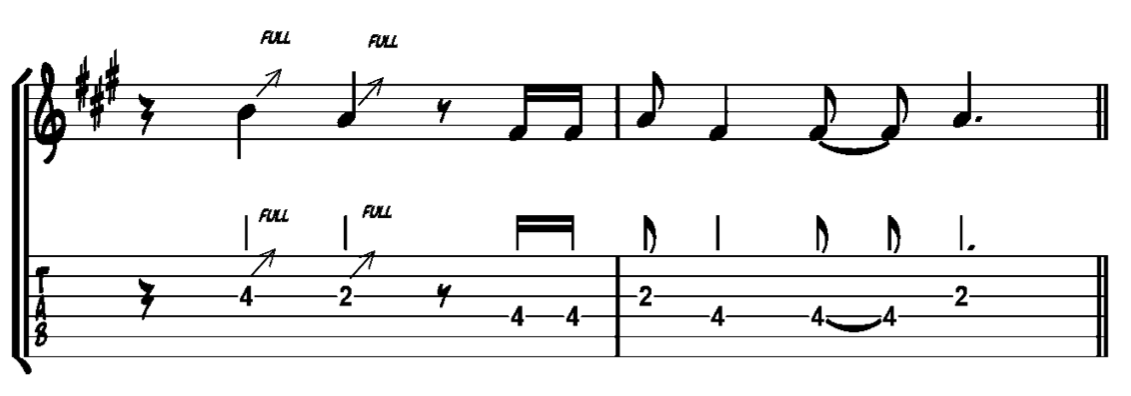
Change the key of the lick to a key you are familiar with and practice it.
1a. key of Am
1b. key of Em
You could also try to play it in different octaves, as shown in the beginning of the article. Choose 1 or 2 variations that you really like and make it your own (a good test is to record the lick and listen to it while you play the related chord). Choosing the lick/variation that you like and practicing it will give you your own sound while improvising. The choice of lick or variant is something highly personal and can be different for everybody.
STEP 4 - Internalize The Lick So You Can Play It Blindly
Up until now, all this work is merely theoretical exercise. If you want to use what you’ve learned you need to practice it so that you can play it blindly. Also it is important to be aware of the context in which you can play the lick. Practice both the original lick and your own updated version to get the maximum result out of your work. Take a chord progression and practice your lick over the chords where it is possible. Play your lick over every chord in this progression that fits (major – minor - 7th – etc.) While Step 2 was all about analyzing the lick, here we are internalizing the lick, so it is important to use your ears so you can hear how the lick sounds over each chord you are playing. You’ve started with something that is “borrowed” from another guitarist and – using the 5 steps outlined in this article - you’ve already made something that is completely personal.
STEP 5 – Steer Away From Becoming A One-Lick Pony
Go forth and take licks from your favorite players, learn them well and try to find at least one variation from the steps above. Take long licks, short licks, parts of a lick, glue one lick after another, etc. You’ll find that doing this will strengthen your improvising skills and help to create your own unique sound on the guitar.
In addition to this article I would recommend you to study my Guide on How To Play The Most Awesome Licks Over Any Blues Chord.
Break out of your blues guitar soloing cage with this Essential Blues Guitar Soloing Lesson.
